This article describes a new technique to transfer the 3D bracket positioning by an effective indirect bonding procedure. Advantages and disadvantages of the CAD/CAM technology for the indirect bonding technique are discussed to help clinician use the indirect digital system routinely.
Recently, a modified indirect bonding technique for a standardized and effective indirect bonding procedure has been described [1] to help orthodontists in bracket positioning accuracy and to exploit full potential of pre-adjusted appliance [2], saving time at chair and giving comfort to the patients [3].
This technique consisted in making bracket-positioning guide on the cast manually by using McLaughlin method [2], with the aim to align, leveling teeth and marginal ridges [1]. It also allowed to control the procedural variables (e.g. tray stability, flushes, curing time, etc.), standardizing indirect bonding technique for the routine and effective use of indirect bonding procedure.
Despite the described advantages of this technique, the accuracy in bracket positioning was influenced by manual skills of clinicians in tracing the bracket-positioning guide on the cast, and by the ability of the trained technician in positioning the brackets on the cast precisely.
The advent of digital orthodontics, in particular digital impression, simplified the process to have a digital model by dedicated CAD software, allowing analysis, measurements, virtual setup, and digital bracket positioning. Since the first paper on prototyped transfer tray published in 2006 [4], several digital systems allowed to transfer virtual bracket position by using a prototyped gig/tray, in which the real brackets were inserted, then transferred on the teeth by using light-curing bonding with some limitation in the clinical stage (eg. Flushes, light curing process).
On the contrary, as reported in 2012 [1], the use of customized bracket base, by pre-dosed light-cured adhesive, showed two main clinical advantages: (1) The customised bracket base respected the surface anatomy reducing the errors related to adhesive excess and flushes; (2) Self-curing indirect bonding used in the clinical stage took just 4 minutes and needed no attention from the operator, whereas the indirect light-curing and bonding took 30 seconds for each bracket from first molar to last molar, requiring also active attention all the time.
As reported in the previous paper [1], one advantage of that technique was the possibility to be integrated with CAD/CAM procedure; since, to our knowledge, there are no papers showing CAD-CAM system able to transfer the virtual bracket position with a pre-dosed customized bracket base. The aim of this paper is to describe a new method to transfer the digital bracket positioning by an effective indirect bonding technique.
- Scan both arches by an intraoral scanner (Trios, 3Shape, Copenhagen, Denmark) and occlusal registration.
- Prepare digital model by a CAD software (Ortho Analyzer, 3Shape, Copenhagen, Denmark).
- Separate the teeth in order to perform virtual setup.
- Using a virtual library, select the bracket system together with the type of arch form in order to align and level both arches. Fix the brackets adjusting the ideal position of each tooth using 3D setup (Figure 1). Then the achievement of six key of normal occlusion5 can be checked (Figures 2-4).
- Prototype the model of malocclusion with and without positioned brackets by 3D printing machine (form 2, Formlab, Somerville, Massachusetts, USA).
- Vacuum-form a 0.3mm bracket-template (Erkodent Erich Kopp GmbH, Pfalzarafenweiler, Germany) on the 3D model with bracket printed on, then cut and mark single gauges for each tooth.
- Put separating agent on the model (Unifol, Perident Dental Products, Florence, Italy) and adhesive on the bracket base.
- Positioning brackets on the model, remove all flushes. Desired position is obtained by using the gauges described above.
- Light-cure the adhesive of all brackets by using light-cure machine (Fotolab UV, Tissi Dental, Milan, Italy). When all the braces were positioned, the adhesive were light-cured. From this point the process continues as described in the previous paper, briefly summarized as follows: use of soft silicone (Emiluma, Opal Orthodontics, South Jordan, Utah) covering the braces in order to have a soft tray; vacuum form and properly cut a 0.3mm tray to contain the soft tray; Soak the model in water for 30 minutes and gently debond the brackets from model; clean residual separating agent with 50-μm size sand in a dedicated machine (Uno, Tissi Dental, Milan, Italy) at 1 bar pressure, then wash the transfer tray with toothbrush and soap, rinse, and dry fully.
- The transfer tray with pre-dosed bracket base positioned by CAD setup is ready together with its bracket template (Figure 5). The clinical stage procedure may start as reported in the previous paper1: Polish the tooth surfaces; Isolate the dentition to obtain a dry field (Nola Dry Field System; Great Lakes Orthodontics, Tonawanda, NY); Prepare the tooth surfaces by etching with 37% phosphoric acid gel for 30 seconds, rinse and dry fully; Apply a thin layer of primer (Transbond MIP; 3M Dental Products) on the teeth and apply self-curing components A and B (Sondhi Rapid Set; 3M Dental Products) on teeth and bracket bases respectively; Firmly seat the transfer tray with both hands, maintaining 2 vectors for 60 seconds: one stabilizes the tray on the arch, and the other keeps brackets and tooth surfaces matched. After first minute, leave the tray on for 3 minutes more, to complete the self-curing process. Remove the tray with a scaler, silicone layer and any residual primer with utility tool; the arch wire can be engaged.
This new method joined the main advantages of CAD-CAM technology and indirect bonding technique reported previously [1], which are described below.
Firstly, use of CAD software emphaticised precision of bracket positioning by fixing the desired tooth position with 0.1mm steps (Figure 1), whereas in previous technique the clinician drew bracket-positioning guide on malocclusion model by using pencils. In this system the operator checked the accuracy of appliance position visualizing the final results in virtual setup, so that aligning, leveling and final occlusion could be previewed and further settled if needed (Figures 2-4).
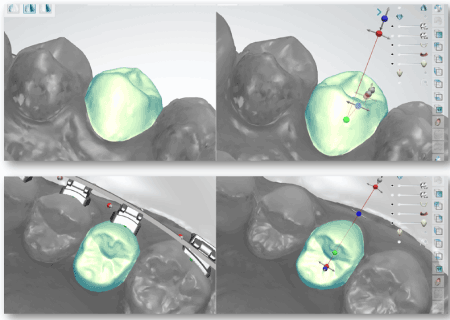
Figure 1. Digital bracket positioning. It is performed in relation to the desired position of each tooth
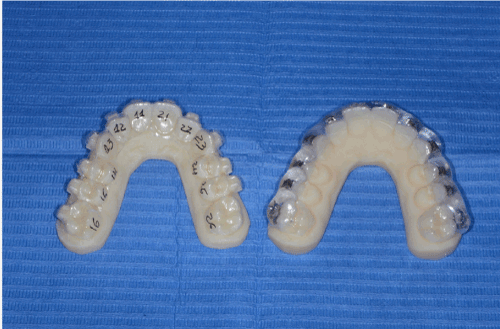
Figure 2. The bracket template for each tooth (left) used to transfer the digital bracket position on the malocclusion model. On the right the transfer tray with the pre-dosed brackets
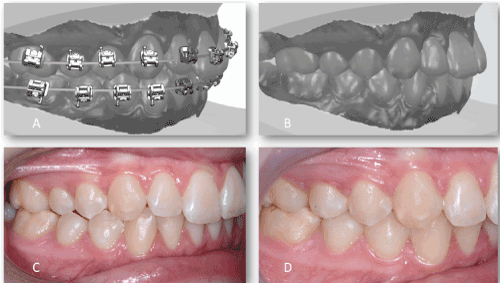
Figure 3. The right view of a clinical example. The digital bracket positioning (A), the virtual setup (B), before treatment (C), after treatment (D)
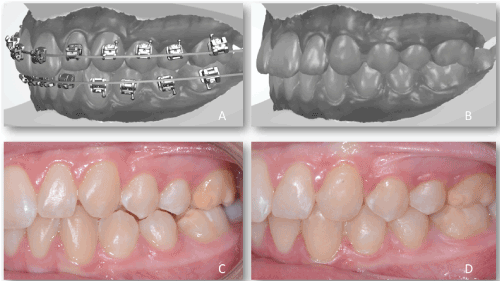
Figure 4. The left view of a clinical example. The digital bracket positioning (A), the virtual setup (B), before treatment (C), after treatment (D)
Secondly, the use of bracket base with predosed light-cured adhesive, described in the modified technique [1], respects the anatomy of each tooth surface preventing both the errors in bracket positioning from excess adhesive and the “hard flushes” that must be removed with the scaler tool. On the contrary, Sondhi Rapid Set does not cause errors because of liquid consistency of 2 components, which can be manually removed by the utility tool at the end of process; Another important advantage related to the self-curing indirect system is the time savings. This self-curing process takes about 4 minutes and needs no attention (except in the first minute); it is significantly shorter than the indirect light-curing process (if it takes 30 seconds for each bracket from first molar to first molar), which also requires active attention all the time. This kind of attention together with the possibility to have flushing and errors due to adhesive excesses are the main limitation of the current jigs which are directly printed by CAD/CAM technology.
The type of tray is the third advantage that can make difference between a successful and unsuccessful indirect bonding. The transfer tray as reported in the previous paper [1] must have specific features: ease and stability in positioning and ease in removing. The tray used in this modified technique was made of two layers: the external rigid one and the internal soft one. The external layer, made of a rigid thermo-formed tray, allowed very good stability during the insertion, as well as easy removal due to its design. Another peculiar advantage of the present technique is bracket template used in the bracket positioning on malocclusion model. Indeed, single bracket template can be also used for direct bonding if some accidental debonding occurs over treatment (Figure 6); this allows to transfer directly the same bracket position fixed by CAD software even in late stages of treatment. In contrary, the altimeter must be used for the bracket repositioning in case of other types of gigs or traditional indirect bonding techniques.
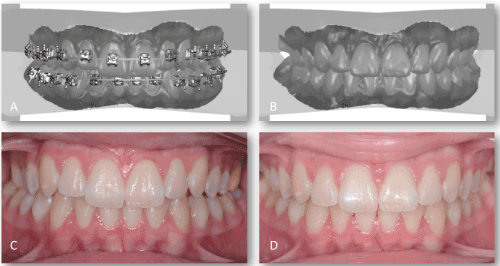
Figure 5. The frontal view of a clinical example. The digital bracket positioning (A), the virtual setup (B), before treatment (C), after treatment (D)
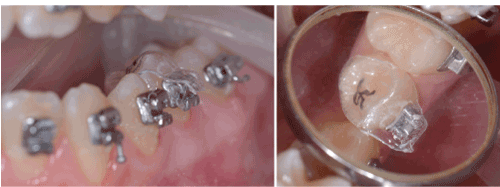
Figure 6. Re-bonding of a lower left second premolar using the bracket template
The main limitation of this technique is fixed costs related to CAD/CAM technologies and trained human resources needed even in extra-clinic time, to apply the entire digital work-flow. Hence, the use of this process is indicated in those clinics where a careful fixed cost analysis and management is routinely performed. Without intra-oral scanner a trained ortho-lab makes this technique and transforms the fixed costs into variable costs; As straight-wire biomechanics is a clinical issue, the clinician must check virtual setup in order to correct some bracket position if needed before printing the 3D models. Indeed, the virtual setup has to be realistic as the tooth movement; then skills of orthodontist are crucial in this phase of treatment planning as well as in biomechanics over treatment time.
In conclusion, this technique introduces the way for customizing the bracket base and helps clinicians use indirect digital system for bracket positioning routinely. Though few authors reported no differences between digital customized technique and conventional system in treatment duration and outcome quality [6], further clinical studies are encouraged to understand more thoroughly if this kind of new systems improves the efficiency of orthodontic treatment considering CAD/CAM technology will be increasingly widespread in dental offices [7].
- Ciuffolo F, Tenisci N, Pollutri L (2012) Modified bonding technique for a standardized and effective indirect bonding procedure. Am J Orthod Dentofacial Orthop 141: 504-509. [Crossref]
- McLauglin RP, Bennet JC, Trevisi H (2001) Systemized orthodontic treatment and mechanics. Edinburgh, Scotland: Mosby.
- SondhiA (1999) Efficientand effectiveindirectbonding. Am J Orthod Dentofacial Orthop 11: 352-359. [Crossref]
- Ciuffolo F, Epifania E, Duranti G, De Luca V, Raviglia D, et al. (2006) Rapid prototyping: A new method of preparing trays for indirect bonding. Am J Orthod Dentofacial Orthop 129: 75-77.
- Andrews LF (1972) Thesixkeysto normal occlusion. Am J Orthod 62: 296-309.
- Penning EW, Peerlings RHJ, Govers JDM, Rischen RJ, Zinad K,et al. (2017) Orthodontics with customized versus noncustomized appliances: A randomized controlled clinical trial. J Dent Res 96: 1498-1504.
- Fantozzi F (1997) Brackettaggio indiretto: fasi di laboratorio sulla costruzione personalizzata di transbrackets e mascherine per la mordenzatura. Bollettino ortodontico Leone 56: 38-41.